


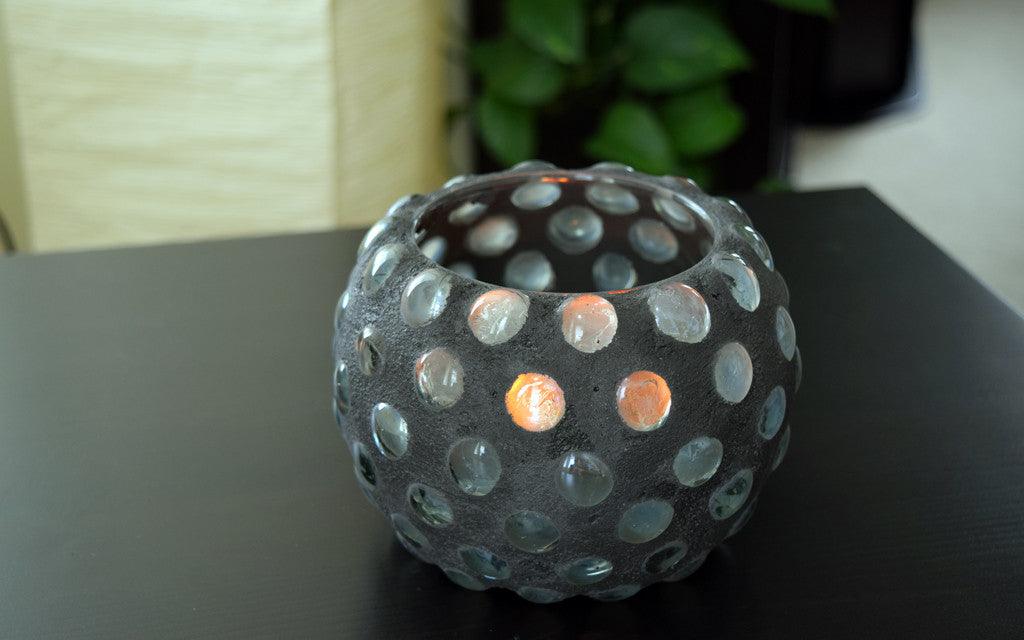
I don’t know about you, but I love to dim the lights in the evening and light a couple of candles to create the perfect relaxing ambiance for the end of my day. Don’t get me wrong, regular candles are great for this! However, there’s nothing quite like the added beauty of a mosaic candle holder to create a dazzling display of light dancing over the walls. And guess what?! You can make your own version at home in a snap! Here’s what you will need to get started…
Supply List:
- 3″ round glass candle holder (I got mine from the Dollar Tree)
- 1 bag of flat glass marbles (…also from the Dollar Tree)
- 1 sponge or sponge brush
- 1 container of mosaic grout
- a hot glue gun
- latex or other disposable gloves

The first step is to apply your flat glass marbles to the outside of your round candle holder using the hot glue. Starting from the top of your candle holder, apply the glass marbles all the way around the top edge, leaving a little bit of space in between your marbles.

When you finish with the top row of marbles, move down to the next row and start applying the glass marbles there. You want to align each marble in the 2nd row with the space between the marbles in the row above it so that the marbles are staggered. When you reach the 3rd row, you will align the marbles up to the 1st row, and when you reach the 4th row, you will align those with the 2nd row…
…and so on until you reach the last row and your candle holder looks something like this. m

Apply the very last row to the bottom of the candle holder following the alignment of the previous rows.

Now you are done gluing and your candle holder is ready to be finished with grout!

Mix your grout according to the directions on the package. It should look something like this…

This is the time to put on your gloves if you haven’t already. Than you want to smear the grout all over your project, making sure to really work it in between the marbles. Let it sit for around 20 minutes, then using a damp sponge, carefully wipe the grout off of the individual marbles. This process is honestly the hardest part of the whole thing. It took me several sessions of drying and sponging to get the marbles looking nice and clear. It’s kind of like going to the beach and trying to rid yourself of every last piece of sand off afterwards…

Once you have finished sponging, let your project dry for 24 hours before using it, and than it’s all ready to go! Pat yourself on the back for a job well done!

This particular candle holder works really well with our small 4 oz soy candle tins or you can always use our soy tea light candles as well! Simply light and enjoy. I might also add that once the lights have been dimmed and the candle has been lit, this particular candle holder also pairs well with a glass of Merlot 


1 comment
Nicole Stewart
I LOVE these. Do you have any available to sell?
Leave a comment
This site is protected by hCaptcha and the hCaptcha Privacy Policy and Terms of Service apply.